
The first hurdle you may encounter at the beginning of your renovation is how to measure a room, if there are no architectural plans for their project. There are some details that are vital for a designer or supplier to be able to give you an accurate design or quotation.
Whether you are using our Online Design Service, or looking to call to a few showrooms to get a feel for what options are out there, you will generally want to bring the measurements of your space with you.
It may seem like a daunting prospect, but once you break it down into steps, it should be easy to manage. Remember, this is just a guide to help the designer visualise the space, your tradesmen will always double check the measurements before building or fitting your new furniture, flooring etc.
How To Get Started
This doesn’t have to be perfectly to scale. Draw in pencil so you can easily erase mistakes. It is more important to have the measurements right, than have straight lines in your sketch!
The longer the tape, the better, so you can measure the full width and length of the room.
Start by measuring the overall length and width of the room.
We will add in the smaller measurements afterwards. The smaller measurements will add up to the total width and length.
Measure the ceiling height and the height of coving or beams if necessary.
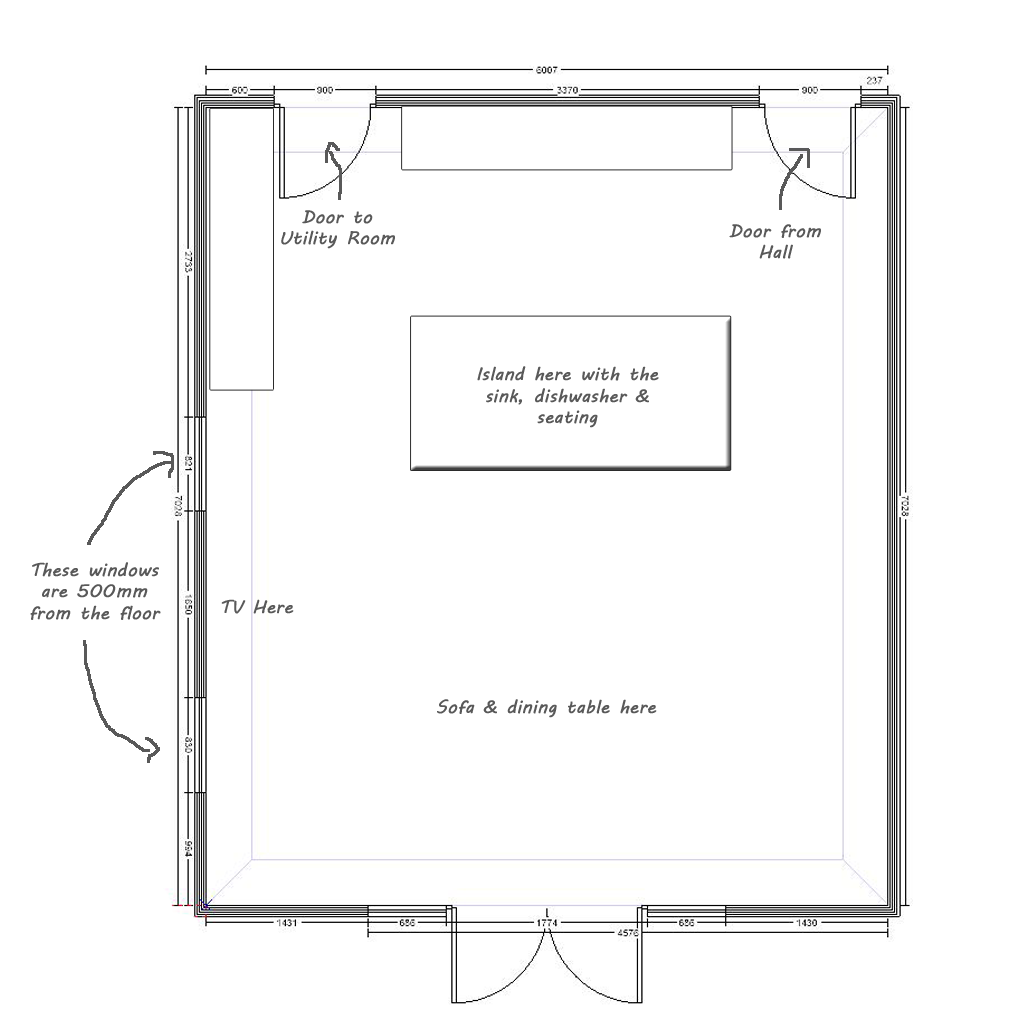
Note the width and height of anything you need to work around:
Windows: Width, height and height from the floor
Doors: Width and height
Switches and Sockets Locations
Light Fixtures (if staying in location)
Boilers, Vents and Radiators: Measure how far they are from one wall and how wide they are
For kitchens and bespoke furniture, the more information you can provide at the beginning, the more accurate your design will be and the quicker your project can progress, so it is worth taking the time to sketch out your layout.
You will need pencil, paper and measuring tape. You don’t need graph paper, and you don’t have to worry about straight lines, or drawing your room to scale. Once your sketch and measurements are readable, you are ready to start your project.
I also suggest taking pictures to show each angle of the room, and a video walk-though if looking to renovate multiple rooms. Not only will it highlight any quirks in the space, such as pillars and vents, it will also give an impression of the amount of light in the room.
Although the most crucial measurements are the walls and immovable objects in the direct location of your new units, it is better to measure the entire room, so your space can be clearly visualised and you may even discover new layout possibilities.
Why not try our step by step guide below and let us know how you get on?